APPLICATION NOTE
Using LinkWare™ Live in the field
Download PDF
On This Page
How do I connect the Versiv™ tester to LinkWare™ Live using a Wi-Fi connection?
1. Insert the Wi-Fi USB adapter into the USB port on the right side of the tester. On the HOME screen tap TOOLS > Network.
2. On the NETWORK screen, tap the Wi-Fi panel. Typically, you will use DHCP(Automatic Address Assignment). To use a static address, set Address to Static, then enter the required addresses.
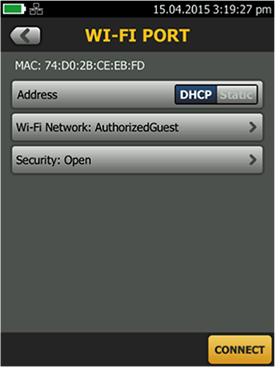
3. On the WI-FI PORT screen, tap the Wi-Fi Network panel. The tester shows a list of the available wireless access points. Tap an SSID. Or, to add an SSID, tap ADD SSID.
4. On the WI-FI PORT screen, tap the Security panel. Select the type of authentication the network uses and enter a password if necessary.
5. Tap CONNECT. When the tester connects to the network, the Wi-Fi connection icon shows in the top left corner of the tester’s screen.
Sign in to LinkWare Live:
1. On the HOME screen tap TOOLS > Sign In.
2. On the SIGN IN screen, enter your Fluke Networks ID and password, then tap SIGN IN
Notes:
- You must sign in to your account each time you turn off your Versiv tester. The tester does not save your login state.
- For Wi-Fi connections, Versiv disconnects from the Wi-Fi network when you do a test because an active radio can interfere with the test results. You must re-connect after the test.
- If your internet connection requires a browser authentication the browser will pop-up while signing into LinkWare Live.
How do I transfer test setups to a Versiv™ tester?
You can transfer test setups and cable ID sets from LinkWare Live Professional projects to a Versiv tester. This function does not transfer test records to the tester.
1. Connect the Versiv tester to the internet, then tap RESULTS > TRANSFER > LinkWare Live.
2. On the SYNC PROJECTS screen, select the project then tap SYNC.
Note: If the tester already has a project with the same name but different settings, you can choose to overwrite the settings. If you overwrite the settings, LinkWare Live adds or deletes settings and ID sets to make the project on the tester agree with the project in LinkWare Live.
How do I push results from my tester to LinkWare™ Live?
1. Connect the tester to the internet using Wi-Fi.
2. On the HOME screen, tap TOOLS and then tap Sign In. (You must sign in each time you turn on your tester. The tester does not remember your login state across power cycles.)
3. On the SIGN IN screen enter your Fluke Networks ID and password, then tap SIGN IN.
4. If you are a member of more than one LinkWare Live organization, select an organization on the ORGANIZATION screen.
5. On the HOME screen tap RESULTS, then tap TRANSFER.
6. On the TRANSFER RESULTS screen, tap LinkWare Live.
7. On the SYNC PROJECTS screen, select the projects to sync, then tap SYNC.
Notes:
- Project names are case-sensitive. For example, if a project is named "HOTEL" on the tester, and LinkWare Live has a project named "Hotel", the results from the tester will go into a new project named "HOTEL" in LinkWare Live.
- When you push results to LinkWare Live, you can also pull test setups from LinkWare Live into the tester.


