Fiber Polarity Basics
May 19, 2022 / General, 101 learning, Best Practices
Polarity defines direction of flow, such as the direction of a magnetic field or an electrical current. In fiber optics, polarity is directional; light signals travel through a fiber optic cable from one end to the other. A fiber optic link’s transmit signal (Tx) at end of the cable must match the corresponding receiver (Rx) at the other end.
So, what is fiber polarity? Fiber polarity could be defined as the direction light signals travel from one end to the other end of an optical fiber cable. While this seems obvious, fiber optic polarity is one area that seems to cause the most confusion among technicians. So, let’s break it down and start at the beginning.

Easy to Understand Duplex
In duplex fiber applications, such as 10 Gig, bidirectional data transmission is carried over two fibers, where each fiber connects the transmitter on one end and to the receiver on the other end. The role of polarity is to maintain this connection.
In the graphic below, you can see that the Tx (B) should always connect to the Rx (A), regardless of how many patch panel adapters or cable segments are in the channel. If polarity is not maintained—connecting a transmitter to a transmitter (B to B), for example—data will not flow. Obvious, right?

To help the industry select and install the right components to maintain proper polarity, TIA-568-C standards recommend the A-B polarity scenario for duplex patch cords. The A-B duplex patch cord is a straight-through connection that maintains the A-B polarity in a duplex channel. It’s also important to note that every fiber connector has a key that prevents the fiber from rotating when the connectors are being mated and maintains the correct Tx and Rx position.

How to check fiber polarity
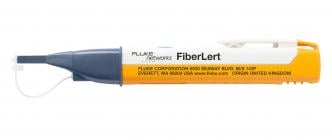
The transmit and receive sides of a duplex connection are easy to mix up in an installation. You can’t always tell which fiber is which, especially in an installation where both ends aren’t visible at once—and looking into the fibers is not only pointless (you can’t see the light), but potentially dangerous to your eyes. You can save a lot of time and guesswork by first determining which side is active and then connecting it properly. The video below shows a quick and simple way to verify polarity using the FiberLert™ Live Fiber Detector.
Which side is live? Stop guessing. Determine the polarity of duplex fiber connections instantly with FiberLert. Just place in front of the fiber end face or port and a light and tone indicate an active fiber.
Three methods to manage polarity in fiber connections using MPO
While duplex fiber cable polarity may seem straightforward, it all becomes a bit more complex when dealing with multi-fiber MPO-type cables and connectors. Industry standards call out three different polarity methods for MPOs, and each uses different types of MPO cables.
Method 1
Method 1 uses Type A straight-through MPO trunk cables with a key up connector on one end and a key down connector on the other end, so that the fiber located in Position 1 (Tx) arrives at Position 1 (Tx) at the other end.

Type A MPO Polarity
When using Method 1 for duplex applications, making the transceiver-receiver flip from Position 1 (Tx) to Position 2 (Rx) is required in a patch cord at one end. This is achieved with an A-A patch cord that shifts the fiber in Position 1 to Position 2 at the equipment interface.

Method 2
Method 2 uses key up connectors on both ends to achieve the transceiver-receiver flip, so that the fiber located in Position 1 (Tx) arrives at Position 12 (Rx) at the opposite end, the fiber located in Position 2 (Rx) arrives at Position 11 (Tx) at the opposite end, and so on. For duplex applications, Method 2 uses straight A-B patch cords on both ends since there is no need for the transceiver-receiver flip. With the same type of patch cord on both ends, concern about which type of patch cord to use to which end is eliminated.

Type B MPO Polarity
Method 3
Method 3 uses a key up connector on one end and a key down on the other end like Method 1—but the flip happens within the cable itself, where each pair of fibers is flipped so that the fiber in Position 1 (Tx) arrives at Position 2 (Rx) at the opposite end, and the fiber in Position 2 (Rx) arrives at Position 1 (Tx). While this method works well for duplex applications, it does not support parallel 8-fiber 40 and 100 Gig applications where Positions 1, 2, 3, and 4 of the MPO interface are transmitting and Positions 9, 10, 11, and 12 are receiving, and therefore it’s not recommended in those applications.

Type C MPO Polarity
With three different polarity methods and the need to use the correct type of patch cords for each, deployment mistakes can be common. To make avoiding those mistakes easier, Fluke Networks’ MultiFiber™ Pro allows users to test individual patch cords, permanent links, and channels for correct polarity.
Download our OM and OS Fiber mini poster, a helpful cheat sheet for OM1, OM2, OM3, OM4, OM5 and OS1a, and OS2 fiber—with minimum modal bandwidth MHz·km, loss limits associated with distances, and more.
Keep Learning
Recent Posts See All >
What Is Fiber Optics? A Guide
2024-03-20
Choosing Stranded vs. Solid Wire Cable
2024-03-06
What Is Return Loss?
2023-02-14
More General Posts See All >
What Is Fiber Optics? A Guide
2024-03-20
Choosing Stranded vs. Solid Wire Cable
2024-03-06
What Is the Right Way to Test an MPTL?
2023-08-22
Explore Our Products
FiberLert™ Live Fiber Detector
MultiFiber™ Pro Optical Power Meter and Fiber Test Kits


©2006-2021 Fluke Corporation。保留所有权利。
RM2011, 20/F, SCITECH Tower, 22 Jianguomenwai Avenue, Chaoyang District, Beijing, China
地址:北京市朝阳区建国门外大街22号赛特大厦20层2011室
联系电话:400-8103435
沪ICP备11037028号-15![]()